Rear Disc Brake Conversion
For several years, I had hoped to be able to convert the rear brakes from drums to discs. For years, one company, TSM (The Streetrod Manufacturing Co. Inc.) had a kit listed on their site but it was perpetually unavailable because they were unable to find anyone to make longer replacement studs. Finally last year, just for giggles, I checked their site and were amazed to find that they actually had the kit available now. It seems they finally decided to abandon the idea of making replacement studs and instead, make a rotor with a ‘hat’ tall enough to slip over the studs and be held in place by the wheel.
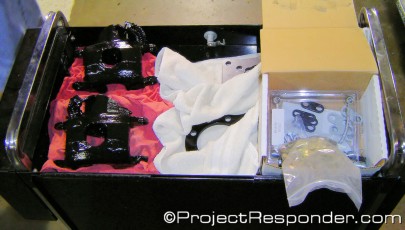
The kit came with a choice of brake calipers. All parts in this kit are new. The calipers we chose were originally designed for the rear axle on a 76 – 78 El – Dorado with parking brakes. They came with pads, and mounting screws. So we ordered the kit and we finally got around to getting it installed. Before the installation, I had all of the brackets powder coated and painted the rotors and calipers so they won’t rust. Since I did not want to risk the install during the show season and end up missing a show because something went wrong, I waited until the off season to do the job. Fortunately, everything went right and the install was actually very simple.
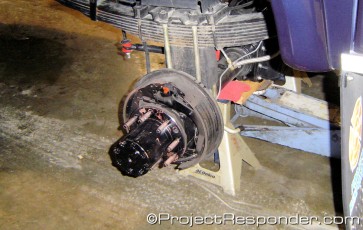
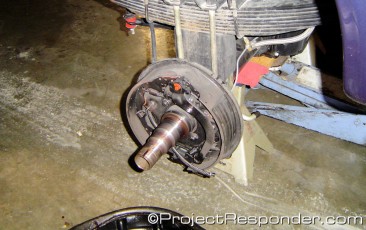
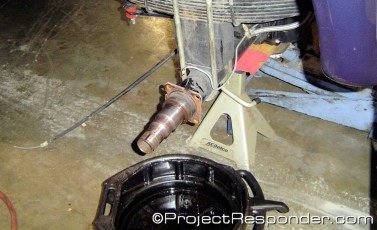
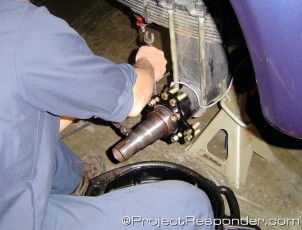
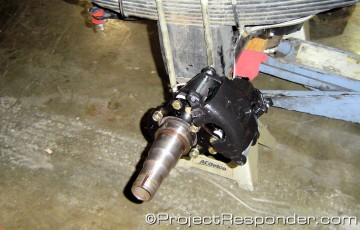
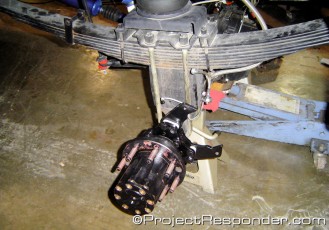
I started by jacking up the rear axle and putting a couple of jack stands under the rear axle so I could work safely. Once in the air, the rear tires and wheels were removed and set aside along with the brake drums. Then I unbolted the axle shafts from the hubs and slid them out. Using a special tool to remove the bearings, I slipped them out and then gently pulled the hubs off of the spindles. So far, so good. Now we turned our attention to the brake assembly. After disconnecting the brake lines and capping them with some plastic caps, I removed the four bolts mounting them to the axle. These were then set aside and the parking brake cables were disconnected at the point where they were attached to the driver’s side frame rail and removed along with the brake assemblies. The cables were disconnected later and measured for new cables with which to replace them.
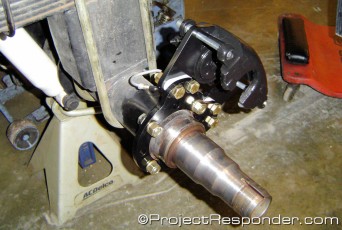
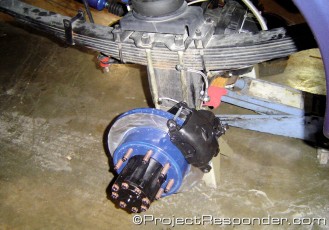
With the brake assemblies removed, I now had to decide how to mount the calipers. Since the bleeder screws have to be positioned at the top of the caliper, I decided to mount them to the rear, but at a 30° angle. Before I actually started bolting the new rear disc brake conversion brackets to the axle, I mocked up the installation by installing the brackets on one side with a few bolts, finger tight to check for clearances and fitment. I had some issues trying to figure out where the T-bolts and flat bolts were used, if at all. After a bit of deliberation, it was decided that I only needed to use two flat bolts, one on each side, to clear the caliper bracket. But because the kit only comes with four regular grade 8 bolts in this length, I had to make a run to the local hardware store to pick up a couple more to be able to complete the installation. Now that I knew how the parts would fit, I removed the new brackets and hardware, got everything cleaned up and started installing the brackets in earnest. The ‘O’ bracket was bolted to the axle tube with three 1/2 – 20 X 1 1/4 Grade 8 Bolts and one 1/2 – 20 X 1 1/4 Grade 8 Flat Head Bolt. Next I installed the caliper bracket to the ‘O’ bracket.
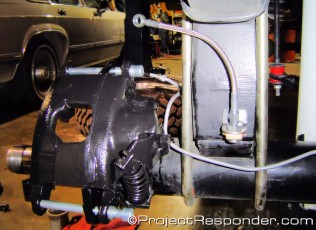
The kit comes supplied with two different size spacers. I used the larger spacers to get the proper clearance. Using four 1/2 – 20 X 1 3/4 Grade 8 Bolts, the bracket was secured to the ‘O’ bracket with the two spacers. With the brackets in place, I had to reassemble the axle before we could install the rotor and the calipers. So I set about reinstalling the hubs. With the hubs in place and the bearings tightened to specs, I replaced the axle shafts and re-bolted them to the hubs. Now I could place the rotors over the studs and install the calipers. With one person holding the rotor in place, the other slid the caliper with the brake pads, down in place over the rotor and in line with the mounting holes on the bracket. From the inside, the caliper pins were slid into place and then tightened with an Allen head wrench. At this point all that was left was to modify the hard brake lines and install the new braided stainless steel lines to allow the calipers freedom of movement.
For the brake lines, because there is a braided stainless steel hose that runs from the frame to the axle tube, I could not just pinch off the line as recommended in the instructions. So I disconnected the hard lines from the junction block and plugged the fittings to prevent the brake fluid from draining out. Now I had to figure out where I wanted to mount the fittings for the brake hoses and terminate the brake lines. I decided to bend the brackets for the hose fittings with a 90° bend so we could drill and tap the Off Road Unlimited lift blocks and mount them on the rear of the lift blocks. Once the brackets were bolted to the ORU lift blocks, I connected the TSM brake hoses to the calipers. Next, I cut the previously existing brake lines and re-bent them to meet the brackets I just installed. After bending and double flaring, I connected the brake lines to the new fittings and then to the junction block. At this point, I then opened the bleeder screws and let the system gravity bleed. After most of the air was released, I bled the calipers as you normally do by pressing the brake pedal with the engine off while someone else opens and shuts the bleeder screws to release the air.
After bleeding, I re-installed the Alcoa wheels and the ProComp tires and let the truck back down. It took 5½ hours to complete the job, including having to run to the hardware store for the extra grade eight bolts. Not too bad for a project of this magnitude and definitely well worth the effort. Once on the street, the difference was like night and day. Whereas before, the front brakes did most of the work and the stopping power was ok. Now with the TSM rear disc brake conversion kit installed, the truck responds immediately when you press on the brake pedal. It gives a much greater feeling of control with the increased response.
Final word: It’s a bit pricy but the quality is top notch and the value is most excellent. This was well worth the investment, especially with the amount of weight this truck carries. If you have an older F-250HD or F-350 with the 10¼” Sterling rear axle, this kit is a must have.